Sorting Laminated Cards: Alzheimer’s Activity

Laminated Cards

Sorting or matching cards with beautiful images on them is a wonderful activity for someone in the mid to late stages of Alzheimer’s/ dementia! I had a hard time finding ones that weren’t too juvenile, so I made may own.  I found that using old calendars (buy 3 at a time so you have a spare!) was an easy and cost-effective way to get some really beautiful images. I bought some calendars from The Sierra Club that were on sale for a couple of dollars at the local bookstore that were perfect.  February and March are good times to find calendars on sale but you can go online and find them  any time of the year. Almost everyone can appreciate nature images (including me!….I absolutely love looking at these.)  Any calendars with pictures that might appeal to your loved one with Alzheimer’s will work.  You could also use your own photos or even art or travel books if you can find them for a good price.

Calendars      Caledar Stand     Calendar-Laminator Image

I have a laminator that I purchased at BJ’s- the big warehouse store.  I paid about $30.00 for it on sale and the plastic laminating sheets are about $12.00 for a box of 65. If you just need the laminator for this one time project, ask around and hopefully you can borrow one.  (Most offices have a laminator and you could just buy a box of the laminator pages.) I cut 40 cards (2 of each image) to measure 5 X 6.5 with a scrapbooking paper cutter and mounted them (with just a dab of glue from glue stick) on cardstock paper. You don’t have to use a special paper cutter machine but I found it easier and more accurate.  Use one color of cardstock so that “Concentration Memory” game can be played, although I find these cards are used for matching and sorting by most. If a person has limited short-term memory, sorting/matching the cards is much less frustrating than playing a memory game with them.
NOTE: when you cut the excess laminated plastic around the cards, leave at least a 1/8″ border of plastic so that they can’t be peeled apart!
As with puzzles, checkers, or anything with multiple pieces, it is up to the caregiver to make sure that they don’t get lost or “taken”. I laminate constantly because I have found that  everything lasts longer and can be wiped off.  This project takes some time to do but my Residents use them every day – so it is well worth the time!

IMG_6483          IMG_6481 (1)    IMG_6482


Seascape Activity Using Torn Paper

seascape

This seascape is a great Alzheimer’s art activity to do one-on-one
or with a group! Most people have very happy associations with
the ocean!  There aren’t a lot of supplies to purchase and it is a
great project for varied skill levels.

HERE IS WHAT YOU NEED:

  • 12 x 12″ SCRAPBOOK PAPER:  1 light blue and  1 sand colored
  • SEVERAL SHEETS OF DARKER BLUE CARD STOCK PAPER (9 1/2″ x 11″ )…
    Try to get at least two shades of blue to add interest
  • WHITE CARD STOCK:  for printing of sailboat / lighthouses
  • IMAGE OF SAILBOAT and LIGHTHOUSE:  (about 3″ high) I found
    the images by Googling “sailboat” and “lighthouse”.  I copied and pasted
    to a separate page and fit four images easily on each page.
  • ELMER’S WASHABLE GLUE
  • 1″ FOAM BRUSH- for glue
  • SMALLER PAINT BRUSH- for sea foam and clouds
  • WHITE ACRYLIC OR WASHABLE PAINT
  • GLUE STICK- for prep
  • SCISSORS- for prep

DIRECTIONS:

  1.  (PREP STEP) Tear the sand colored 12 x 12 piece of scrapbook paper
    in half. (As you are tearing, pull the paper upward and apart so that
    it is a “wavy” tear.) Adhere the half torn piece of sand colored paper
    to the full sheet of light blue with a glue stick.  (NOTE:  I find that
    people with Alzheimer’s and other dementias often have a hard
    time with glue sticks and  things don’t get glued on very well,
    but they won’t be doing the “prep step” and the glue stick makes
    everything neater and less heavy and “bubbly”.)
    seascape-12.jpg
  2.   (PREP STEP)  Tear the darker blue card stock paper into long
    wavy strips of various sizes.
    seascape 2       seascape-1.jpg
  3.  (PREP STEP)  Google “sailboat” and “lighthouse” images.  Copy and
    paste chosen image to a separate page and print out on white card stock
    (I fit four on a page but it you are careful, you may even fit six.  Then
    cut out the lighthouses/sailboats.
    seascape-4-1.jpg          seascape-3-1.jpg
  4. Each artist should start with a 12 x 12 piece of scrap book paper- half
    sand colored/ half light blue (already prepared), darker blue torn paper
    strips (already prepared), a 1″ foam brush, and glue.
    seascape 12         seascape 1         IMG_4561-e1432091583732.jpg
  5. Glue the dark blue paper strips onto the middle of the 12 x 12 (half sand
    colored/ half light blue) paper to form the “ocean”.
  6. Next,  glue on the lighthouse and the sailboat. ( Its OK for a sailboat to
    float upside down in the sky!!  Remember, there is no right or wrong
    in art!)
  7. Last, paint cloud and sea foam details using the white paint and smaller brush.

HERE ARE SOME EXAMPLES OF ARTWORK:
(….by artists of various cognitive and skill levels…)

seascape-9.jpg            seascape-6.jpg

seascape-7-3192360235-1500860464737.jpg          seascape-8.jpg

seascape 10

Glitter Pumpkin Alzheimer’s Activity

glitter-pumpkin

It is hard to find Halloween activities for adults, particularly those with
Alzheimer’s or other forms of dementia, that are easy but not too juvenile.
However, the Glitter Pumpkin is almost magical (and also an impressive
seasonal decoration or gift).  It is obviously a project that requires
some supervision….particularly with the glitter application….but it is
simple to do and a wonderful activity for grandchildren to participate in
along with Grandpa or Grandma.  Note that the men in my “senior crafters”
group enjoyed this just as much as the ladies.  At first, I told the guys
that their job was to apply the glue and that the ladies would do the glitter
(thinking that glitter was a gender thing….strictly for the women)…..but the
guys insisted on sprinkling on their own glitter and were very proud of the
finished product.  VERY IMPORTANT....PLEASE BE CAREFUL WITH THE
GLITTER AS YOU DON’T WANT IT TO GET IN ANYONE’S EYES!  I did the
glitter myself for some people and just let them watch. Applying the glue is
the step that takes the bulk of the time.  It takes roughly a half hour for a
medium to large pumpkin.  Some of my lower functioning folks were given
a very small pumpkin and were supervised even for the glue part.  It is a great
time to reminisce about growing or carving pumpkins during their younger
days.  The pumpkin with it’s bright orange color is very familiar to all and generally
represents happy times.

  • YOU WILL NEED THE FOLLOWING SUPPLIES:
  • pumpkinelmers-gluefoam-brushespolyurethaneglitter    fall-leaf-garland
  • PUMPKINS (any size/ Make sure the skin  is not punctured at all to avoid
                          premature rotting.)
  • LARGE PLASTIC BIN OR OTHER CONTAINERLine it with paper so that you can pour the excess glitter back into the jar and the glue that inevitably comes off of
    the pumpkin can just be discarded with the papar.  It will save you a lot of time
    and effort.

    • FOAM BRUSHES   1″ size is good
    • ELMER”S WASHABLE GLUE
    • CUP or small bowl for glue
    • GLITTERr (I used non-toxic Orange, Gold, Black, Royal and got the larger 8 oz. size for multiple pumpkins.)
      VERY IMPORTANT : Get the larger granuals, NOT the very fine glitter.
    • POLYURETHANE SPRAY (I used Krylon Gloss, about $6.00 for a can)
      Spray on several coats.
    • FALL LEAVES OR RIBBON  to be used as a finishing touch around the stem
    • HOT GLUE GUN to secure the leaves or ribbon around the pumpkin stem

DIRECTIONS:
1.  Wash and dry pumpkin  AGAIN, I MUST EMPHASIZE THE IMPORTANCE OF
     OF CHOOSING A PUMPKIN WITHOUT HOLES OR GOUGES IN THE SKIN.
     ROTTING CAN HAPPEN VERY QUICKLY AND CREATE A MESS AND VERY
     UNPLEASANT SMELL.  ALSO, PUT A PLATE UNDERNEATH THE FINISHED
     PROJECT TO BE EXTRA SAFE IF PLACED ON FURNITURE OR WOOD SURFACE.

2.  Brush on a VERY THICK coating of Elmer’s Glue onto the pumpkin with the foam
brush.  NOTE: (The pumpkin should almost look WHITE after glue is applied.)
pumpkin-with-glue


3.  Sprinkle on glitter making sure to cover all the glue. (No need to do the underside.) (Use the SMALL HOLES  for sprinkling rather than the bigger opening on the cap to avoid too much glitter coming out at once.)
—-You can add more glue and glitter over top of what you had first applied if
you missed some spots with the first application.——
4.  Let glittered pumpkin dry and then spray with polyurethane to
make sure that glitter stays on the pumpkin.  SPRAY PUMPKINS OUTSIDE
AND DO THIS WITHOUT HELP FROM YOUR SENIOR CRAFTER FOR SAFETY REASONS.
NOTE:  After the polyurethane, your pumpkin should last several weeks providing that
you haven’t punctured the skin in any way.
5.  Use the hot glue gun to add some artificial fall leaves or a ribbon if desired
Look how beautiful!!!!

.glitter-pumpkins-finished


Patriotic Table Decoration


  • Patriotic Picmonkey
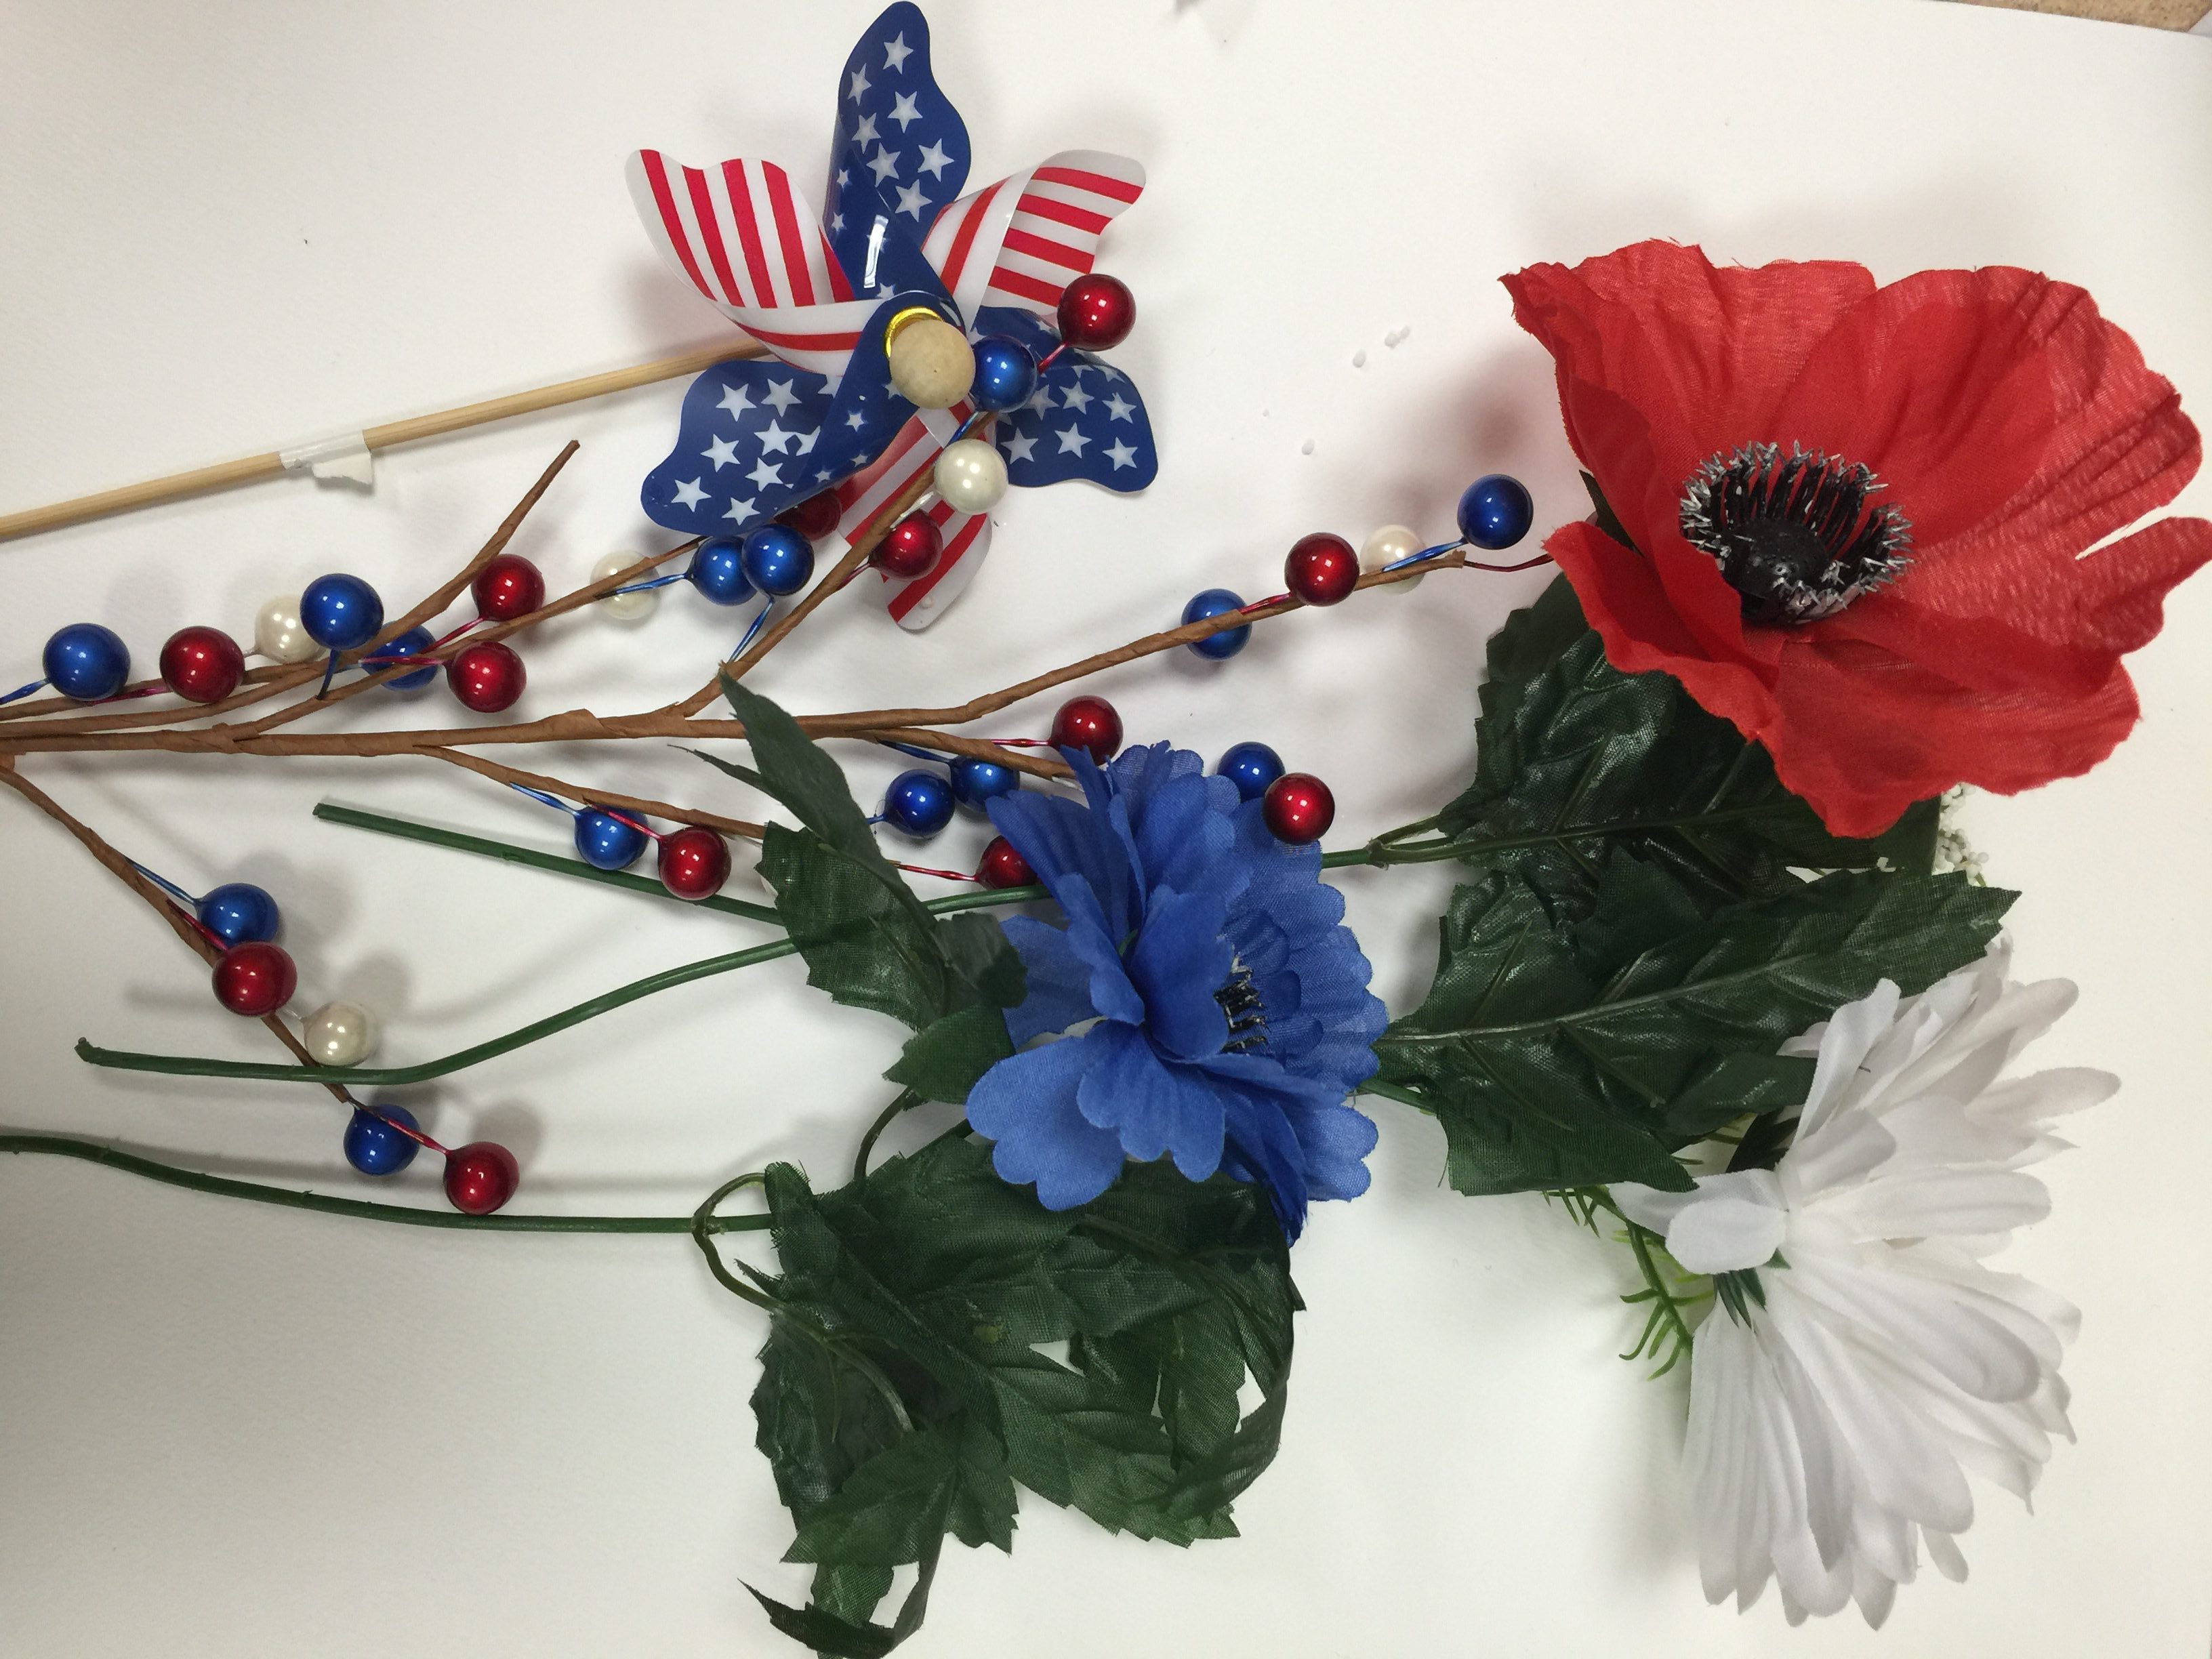
This Patriotic Craft was made for a Memorial Day celebration but would be perfect for 4th of July festivities as well. In some cases, a person with Alzheimer’s (or another form of dementia) may need some help but it should be relatively easy for most if the steps are introduced and completed one at a time.  Remember that with Alzheimer’s, the order of things can be confusing so it is important not to put everything out on the table at once! This project took about a half hour for most of my senior crafters. I ended up putting the ribbon around the neck of the bottle myself as this step seemed to be too difficult for many but it added the perfect finishing touch to this project. The bright colors and variety of items to touch and feel made this a particularly fun, interesting and rewarding craft and would be great for kids too! This idea could be used for other holidays also.  For instance, it could be done for Christmas using silver and white garland and poinsettias, silver stars, white beans to weight it down, etc.


Here are the supplies that you will need:

  • WIDE MOUTH PLASTIC BOTTLES….”BAI” (or other brand)..Cut off label
  • BEANS (to weigh the bottle down)….I used red kidney, black and white
  • 3 FEET of PATRIOTIC GARLAND…..I purchased mine at my local dollar store
    and cut a 9 foot garland into three pieces which worked well.
  • STAR STICKERS…..(Red/Wht/Blue)…Mine were felt and purchased from AC MOORE
  • RED WHITE AND BLUE ARTIFICIAL FLOWERS, PINWHEELS, ETC.
  •  2 to 3″ WIDE PATRIOTIC RIBBON

Here are the steps(ONE STEP AT A TIME)

STEP #1: Put assortment of stickers out on the table. Adhere the stickers onto the
blank bottle.  (Some of my residents needed help peeling them but most did fine.)
.Memorial Day 3
STEP #2:  Pour about two inches of beans into the bottle.
IMG_3080_1 Memorial Day 1Memorial Day 4       
STEP #3:   Push the garland into the bottle. (This is why you need
a wide mouthed bottle.)  Everyone was successful with this step!
image

STEP #4Add flowers and other decorations to make a
pleasing arrangement.  (three to five items should be enough.)
image        IMG_3135
STEP #5Tie a wide festive ribbon around the neck of the bottle for the finishing
touch. (This is the most difficult step and you may need to assist with it.)
Isn’t it  colorful and beautiful?!
                     IMG_3078


Paint a Canvas! (Alzheimer’s Activity)

Canvas Painting Pinterest


Gallon Acrylic Paint - TurquoiseProduct Details

The simple act of painting a canvas is both interesting and soothing for a person who is dealing with Alzheimer’s or any form of dementia. Most people have a memory of painting something (a wall or piece of furniture) in the past, and there is no right or wrong way to do it on the canvas. It is easy to be successful and relaxing to do something repetitive.
There can also be conversation and reminiscing around the subject of painting. “Did you ever do any painting projects around your house?”  “Would you have used this color in your living room?”….etc. I had purchased a large canvas that was going to be the backdrop for another group art project that we were about to work on and realized that painting the canvas was actually a great activity in itself.  I had a couple of my senior artists sit on opposite sides of the table and gave them paint and a brush.  They figured out the rest.  (Even a person with Alzheimer’s who can no longer remember that they have to continually dip the brush in the paint can do this with some one-on-one
help.) It is cost effective because the activity can be repeated over and over again on the same canvas. Paint it a color, then paint it white…paint it a color, then paint it white again….

HERE IS WHAT YOU’ NEED:

  • LARGE WHITE CANVAS:   (It should be smaller than the width of the table you are working on)
    I used a 30″ X 40″ canvas from Amazon and it was a great size for two people to paint on opposite sides of the table. You could use any size really. The size I used took my seniors about 45 minutes to cover.  It depends on the brush and the capabilities of each person.
  • ACRYLIC PAINT:  I used aqua because blues and greens are relaxing colors but any color is fine.
  • PAINT BRUSH:    1″ Craft Brush.  Do NOT use the foam ones as they often break when moving back and forth in a painting motion.

NOTE:  Acrylic paint is water based and does not come out of clothing or fabric but washes off hands and most smooth surfaces.  It goes onto the canvas better than washable paint though. Obviously use caution as it would be dangerous if ingested.

.